How to create a password protected Google Form in 6 easy steps
Sometimes, you need to ensure that only specific people can access and fill out your form. The good news is you can create a password-protected Google form. Read on to know how!
Creating online forms is a great way to collect information quickly and efficiently. But sometimes, you need to ensure that only specific people can access and fill out your form. This is where a password-protected Google Form comes in handy.
It’s a surprisingly simple way to create a secure online form that only authorized users can access.
Today, I'll walk you through the steps on how to lock a Google Form with a password in no time.
6 simple steps to create a password-protected Google Form
Here’s how to password-protect Google Forms in six easy steps.
- Create a new Google Form
Go to forms.google.com in your web browser and make sure you are logged in with your Google account.
This is the main page where you can create and manage your forms. Click on the big plus icon (+) to start a new form. This will open a blank form that you can customize.

Click on the area that says "Untitled form." This is where you will enter the name of your form.
The title should clearly describe what your form is about. For example, you could name it "[Event Name] Registration" if it's for signing up for an event.

Below the title, there's a space “Form description” to add a description. Click in this area and type a brief explanation of the form's purpose.
It will help respondents understand why they are filling out the form. For example, you might write, "Please fill out this form to register for our upcoming event. The details of the event are mentioned below. We look forward to seeing you!"
- Add a password question
Now that your form has a title and description, let's add a password question to make sure only authorized people can fill it out.
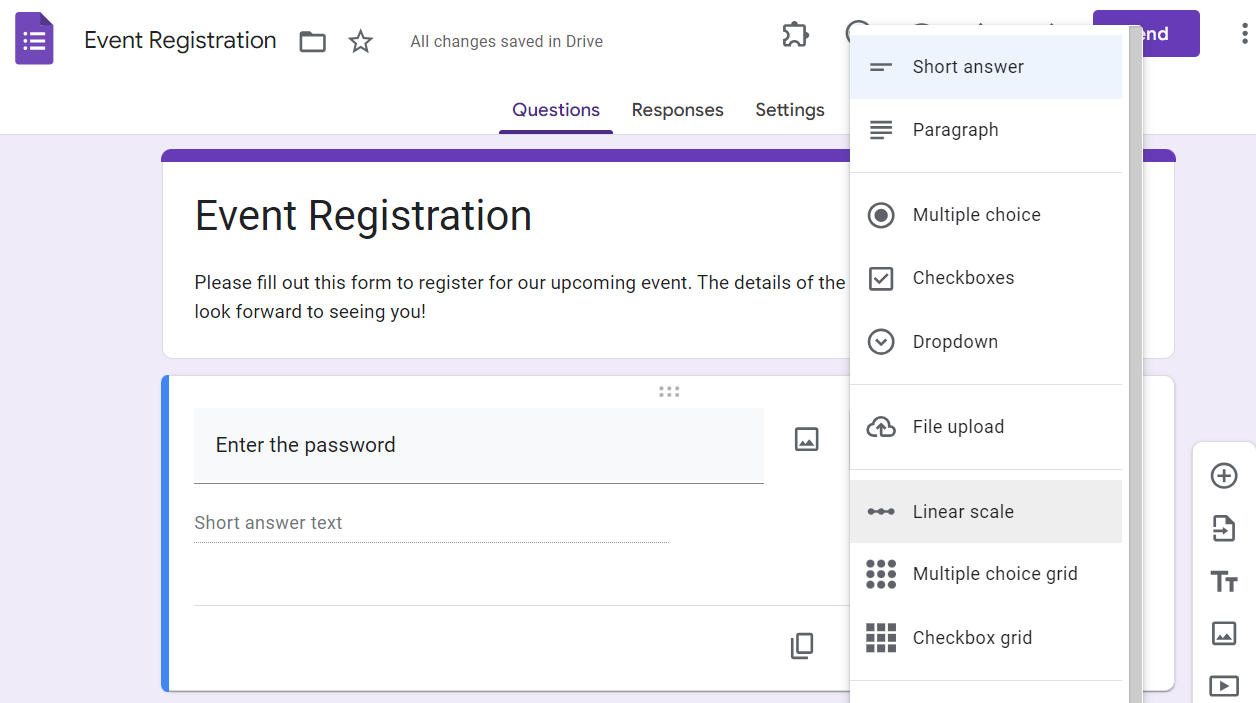
Click on the plus icon (+) in the toolbar on the right side of the screen. This will add a new question to your form. Click on the dropdown menu next to the question field and select "Short answer." This type of question is ideal for entering a password.
Side Note: The first question field with the short answer text might be there by default. In that case, you don’t need to add one by clicking the (+) button from the toolbar.
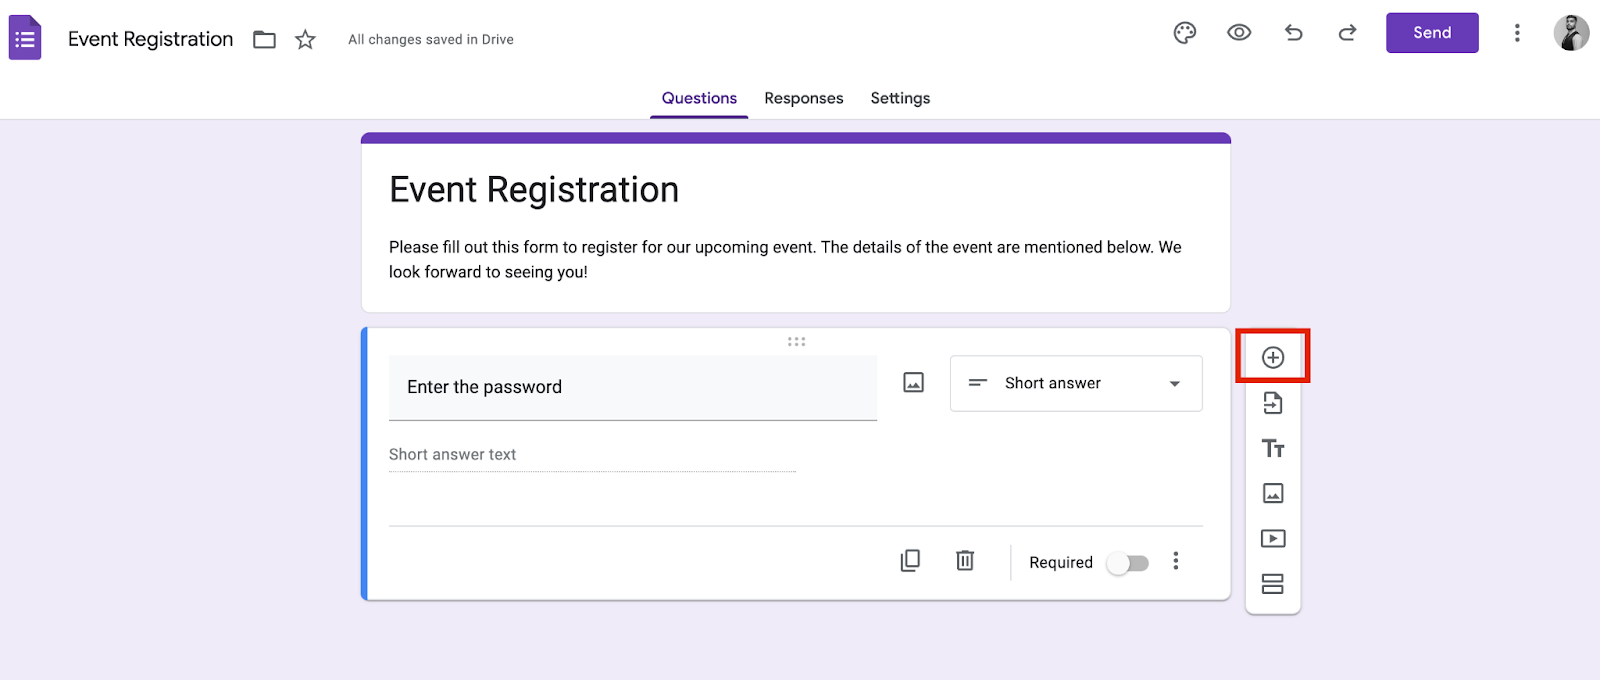
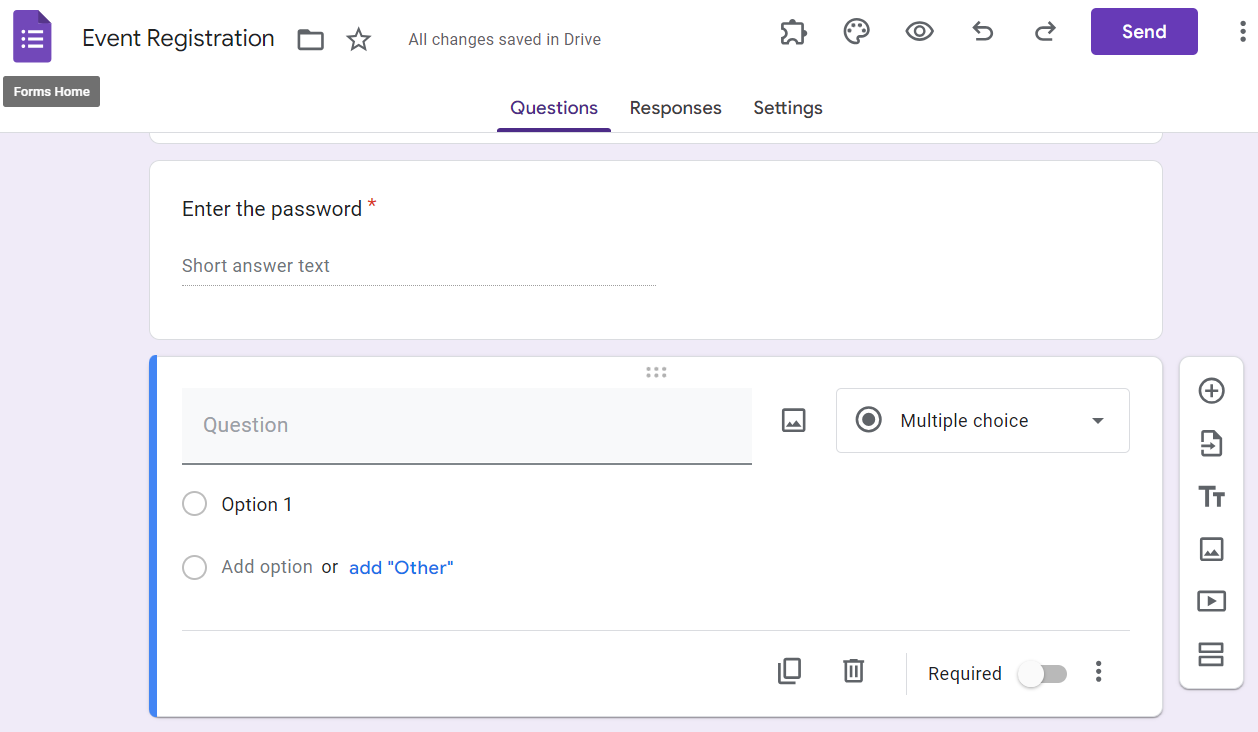
In the question field, type something like "Enter the password." This will make it clear to respondents that they need to enter a specific password to proceed.
- Set up response validation
Response validation is a feature in Google Forms that allows you to set rules for what kind of answers are accepted.
For example, you can use it to require a certain format, like an email address, a number within a range, or a specific text (like a password).
Click on the three dots in the bottom-right corner of the question box and select "Response validation."
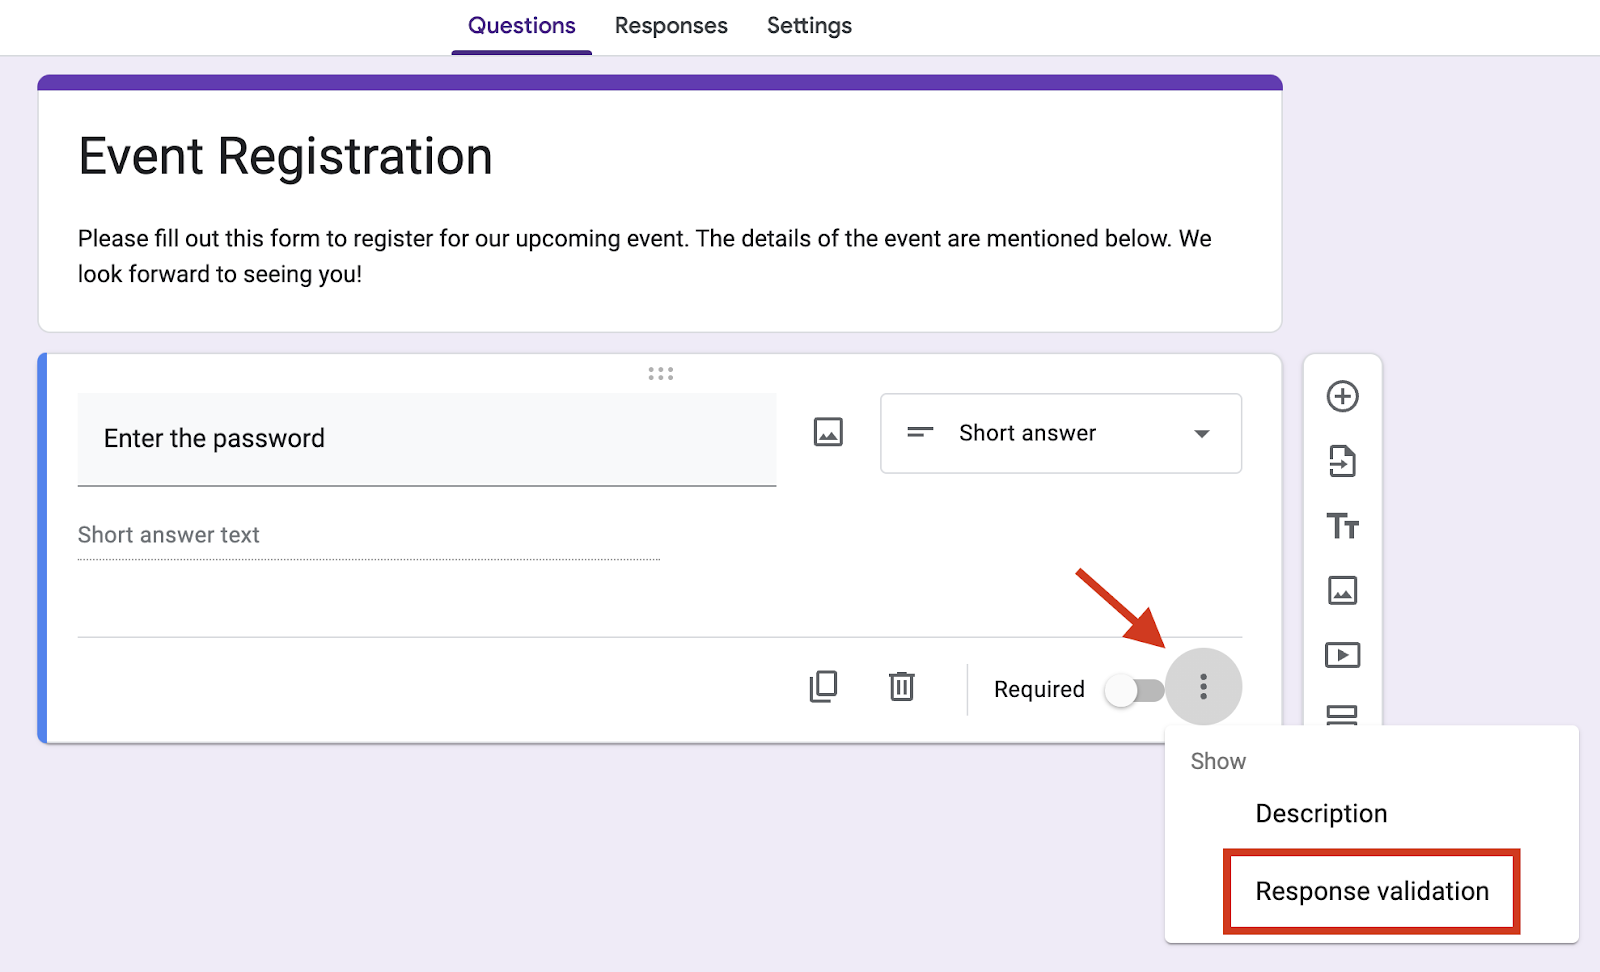
Now, you have to configure validation settings.
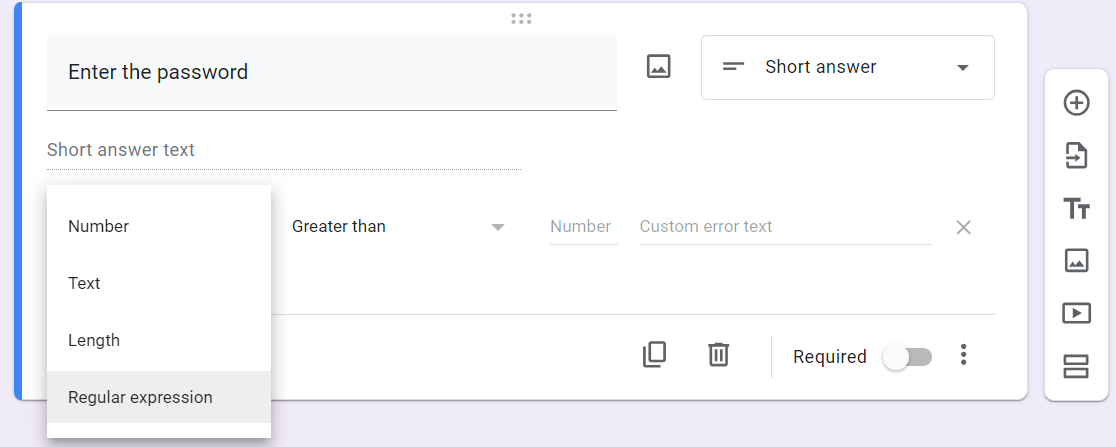
- Choose validation type: In the first dropdown menu, which is set as “Number” by default, select "Regular expression." This option lets you set specific text that must be entered.
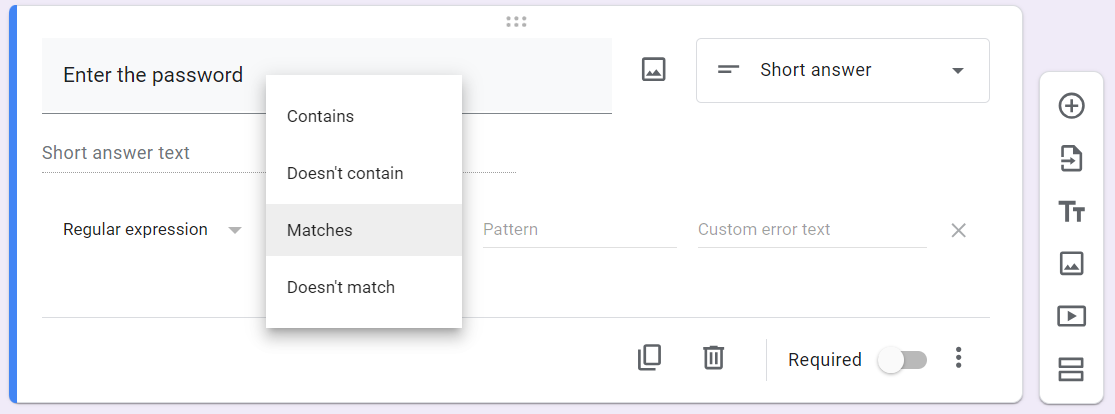
- Set matching rule: In the second dropdown menu, which is set as “Greater than” by default, choose "Matches." This means the answer must exactly match what you specify.
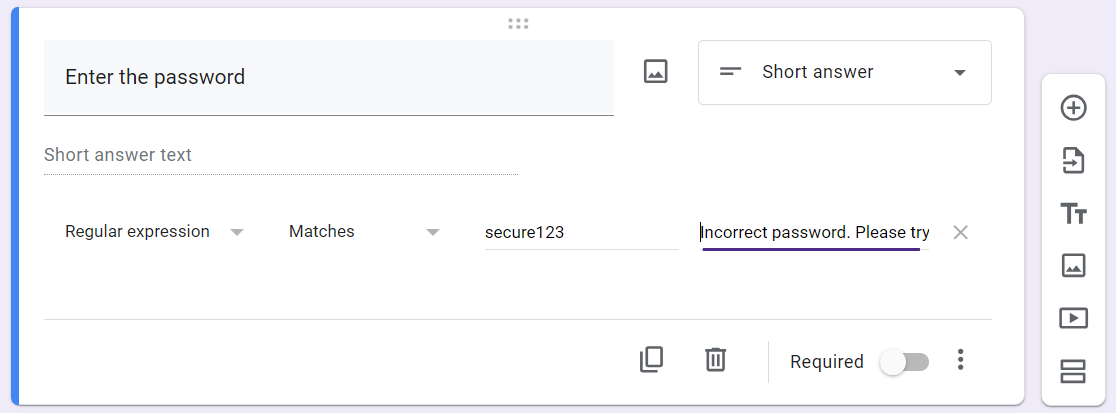
- Enter the password: In the first text box which says “Number”, write the password you want users to enter. For example, write "secure123" if that’s your chosen password.

- Add a custom error message
Adding a custom error message is important to guide respondents if they enter the wrong password.
After setting up your password, you will see a text field labeled "Custom error text."
Click this field and type a message that will help users understand they need to try again and write the correct password. For example, you can write, "Incorrect password. Please try again."
- Add your form questions
Now that you’ve set up a password question, it’s time to add the main questions to your form. Click on the plus icon (+) on the right side to add a new question to your form.
Click on the dropdown menu next to the question field. You can choose from different types of questions like:
- Short answer: For brief text responses.
- Paragraph: For longer text responses.
- Multiple choice: For selecting one option from a list.
- Checkboxes: For selecting multiple options from a list.
- Dropdown: For selecting one option from a dropdown menu.
- Linear scale: For rating something on a scale.
- Multiple choice grid: For matrix-style questions.
Type your question in the "Untitled Question" field. For example, "How satisfied are you with our service?"
If you selected a question type that requires options, like multiple choice or checkboxes, click on "Option 1" and start typing your options. Click "Add option" to add more choices.
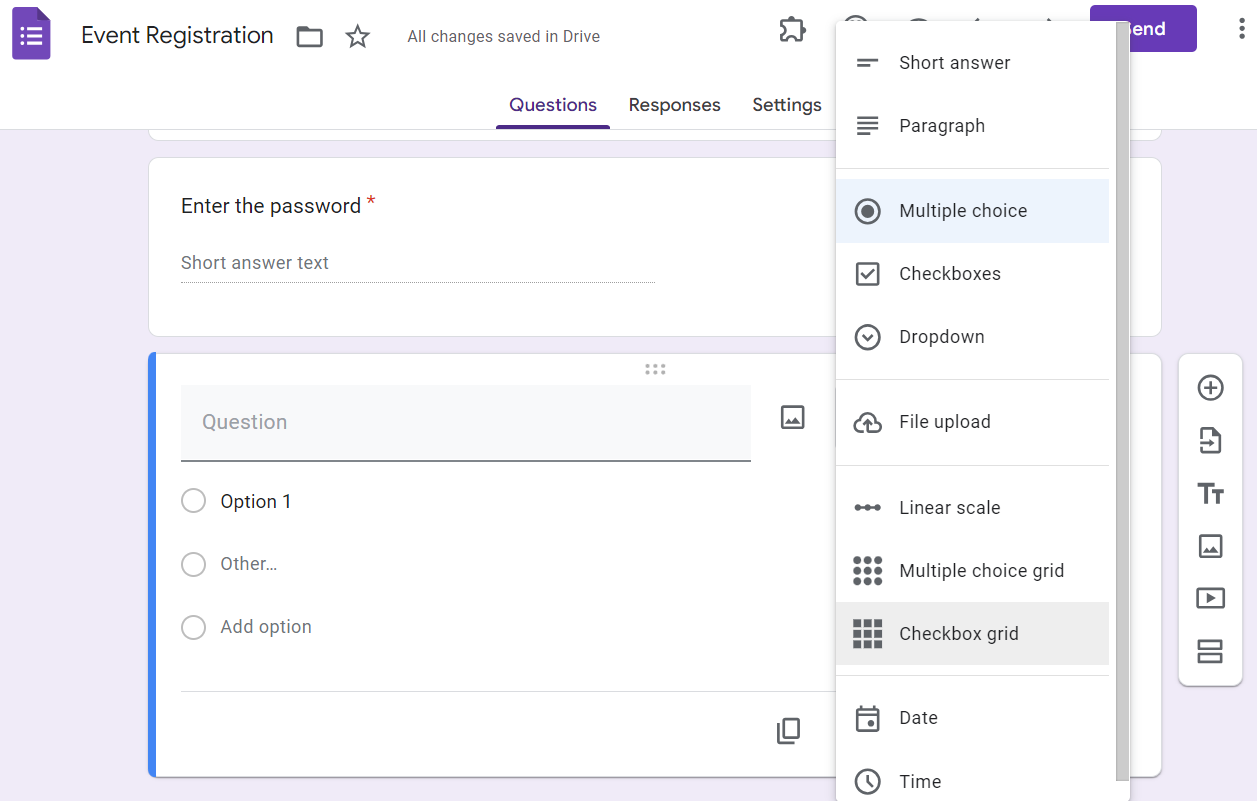
Use the duplicate icon (two overlapping squares) to quickly copy a question if you need similar ones. Use the trash can icon to delete a question if you change your mind.
Toggle the switch at the bottom of each question to "Required" if you want to make sure respondents must answer that question before submitting the form.
- Preview and distribute your form
Before you share your form, check how it looks and make sure everything works correctly.
In the top-right corner of the form editor, click the eye icon ( 👁) to open a preview of your form in a new tab.

Go through the form as if you were a respondent. Enter answers for all the questions, including the password question.
Make sure the response validation and custom error messages work as expected. If you find any issues, go back to the form editor and fix them.
Once you’re happy with your form, it’s time to share it with your audience.
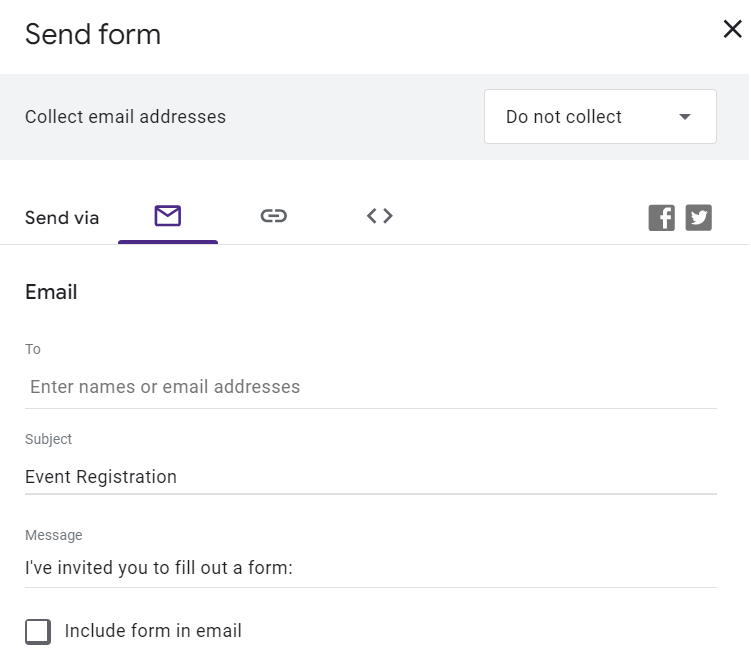
In the top-right corner of the form editor, click the “Send” button. Next, choose how to share your password-protected Google form:
- Email: Enter the email addresses of your recipients. You can also add a custom message if you like. Click “Send” to email the form directly to them.
- Link: Click the link icon (a chain). Copy the URL provided and share it via email, social media, or any other way you prefer.
- Embed: Click the embed icon (< >). Copy the HTML code provided and paste it into your website’s HTML code to embed the form on a webpage.
Alternative way to make Google Forms with login
An alternative way to control who can access your Google Forms is by requiring users to log in to Google Forms with their Google account.
This method ensures that only users with specific Google accounts can view and fill out the form. For example, you might only want employees from your organization to have the company’s email address (like “john@tesla.com”) to fill out your Google form.
It also allows you to limit responses to one per user, which provides an additional layer of control and security.
Here’s how to set up Google Forms with login:
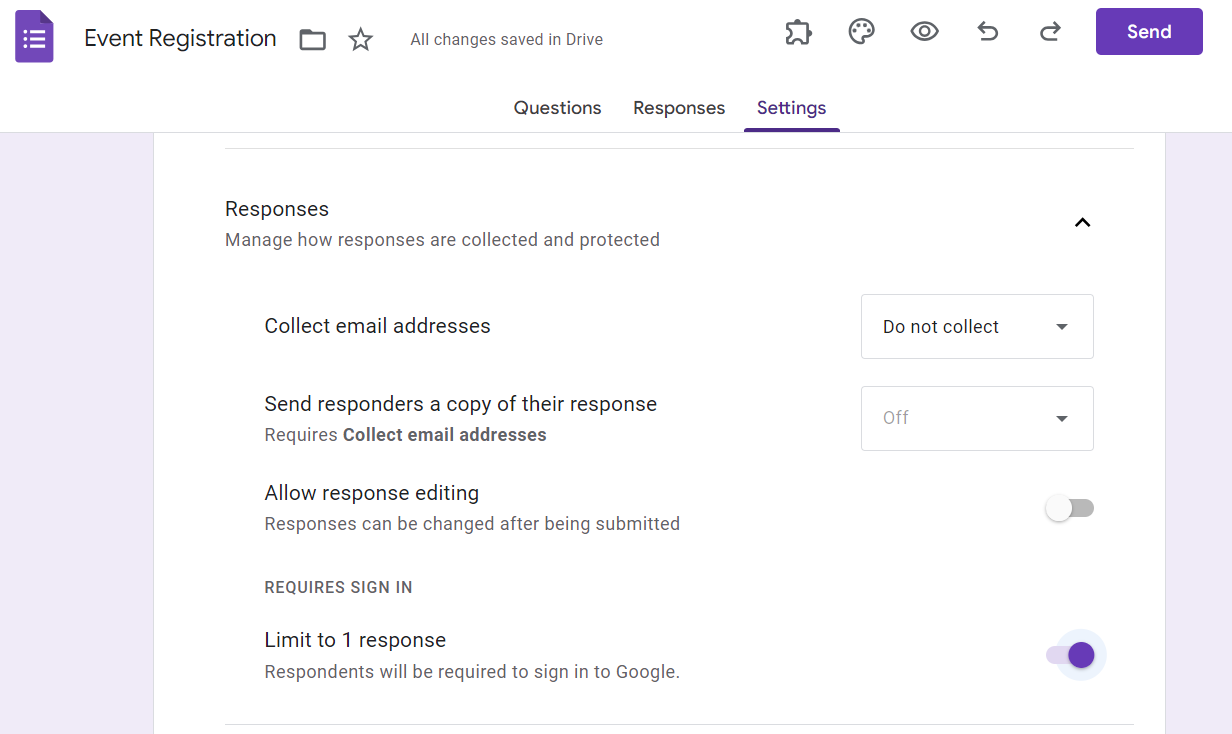
- Make sure your Google Form is open in the editor mode. Click on the settings tab on the top right to open the form settings.
- In the "Settings" window, go to the "Responses" tab and turn on the "Limit to 1 response" option. This feature in Google Forms requires sign-in before a respondent can submit a response, and it prevents users from submitting the form more than once.
- If you want to collect email addresses automatically, check "Collect email addresses." Once you have collected the emails of your respondents, you can track who has responded and manually filter the unwanted respondents.
When should you use protected forms?
Password-protected Google forms ensure that only authorized individuals can access and fill out your forms. Here are a few common use cases where protected forms become necessary:
- Sensitive Information Collection
When collecting sensitive information, such as personal details, financial data, or health records, it's crucial to restrict access to trusted individuals.
The 2022 Annual Data Breach Report by the Identity Theft Resource Center revealed that 422.1 million individuals were affected by sensitive data breaches last year.
Password protection ensures that only people with the correct password can access the form, so your data stays safe.
- Event Registrations
If you're organizing a private event, like a company meeting, a VIP event, or an exclusive workshop, you can use a password-protected Google form to manage registrations.
This way, only invited guests who have the password can register. The password maintains the security of Google Forms and prevents unauthorized sign-ups.
- Internal Surveys
For internal company surveys, feedback forms, or employee evaluations, you need to limit access to employees only.
Password-protected forms ensure that only staff members can fill out the form and maintain the confidentiality of your organization.
- Educational Assessments
In educational settings, you might need to conduct tests or quizzes that only certain students can access. A password-protected Google form ensures that only the students with the password can take the assessment.
A Cooler & better alternative to Google Forms
People use password-protected Google Forms because Google Forms is easy to use and integrates well with other Google services.
However, Google Forms has its limitations, such as basic design options and limited customization. But that’s understandable because Google's primary focus is not forms.
So if you're looking for a more robust and flexible alternative to Google Forms, give Formaloo a try.
Like Google Forms, Formaloo allows you to create password-protected forms from premade templates to ensure that only authorized users can access your form.
Additionally, it offers features to limit duplicate responses, enhancing the integrity of your data collection.
Formaloo also includes a range of form-building features such as drag-and-drop customization, advanced analytics, conditional logic, and integrations with various third-party applications.
These features make it easier to create engaging, interactive forms tailored to your specific needs.
Formaloo offers all the functionality you need, plus a whole lot more. Try it for free today.

%20(1)%20(1).jpg)

.jpg)


